How to Build Forms and Surveys in Claude (Step by Step)
Building a form used to mean leaving whatever you were working on. You'd switch to Typeform or Google Forms or Jotform, drag fields around a canvas, configure logic, copy a link, paste it back into your chat. The reverse trip went the same way every time.
That loop is gone now. You can build forms and surveys in Claude itself: describe what you need, the Weavely connector builds it, and you get a working preview link back in the same conversation. If you want to change something, you say so. If you want it live, you ask Claude to publish.
This guide walks through the full workflow. You'll connect Weavely to Claude in under two minutes, build a real customer feedback survey from a single prompt, add conditional logic that hides questions until they're relevant, and publish the form so you can start collecting responses. By the end you'll have built four different forms, all through chat.
What you need before you start
Three things, none of them complicated:
- A Claude account. The free tier works (it allows one custom connector, which is all you need here); paid plans allow more.
- Claude Desktop or claude.ai. The connector works in both.
- A Weavely account if you want to publish your forms and collect responses. You can sign up for free at the publish step, so don't worry about this upfront.
No code. No API keys. No paid Weavely plan required for any of this.
Step 1: Connect Weavely to Claude
Adding the Weavely connector takes about a minute, and the steps are the same whether you're on a free or paid plan.
In Claude (Desktop or claude.ai), go to Customize, then Connectors, and click the "+" button to add a custom connector. Give it a name (we'd suggest "Weavely" but anything works) and paste the URL:
https://mcp.weavely.ai/mcp
Click Add and follow the prompt to authorize. That's it. The connector is now available in any conversation.
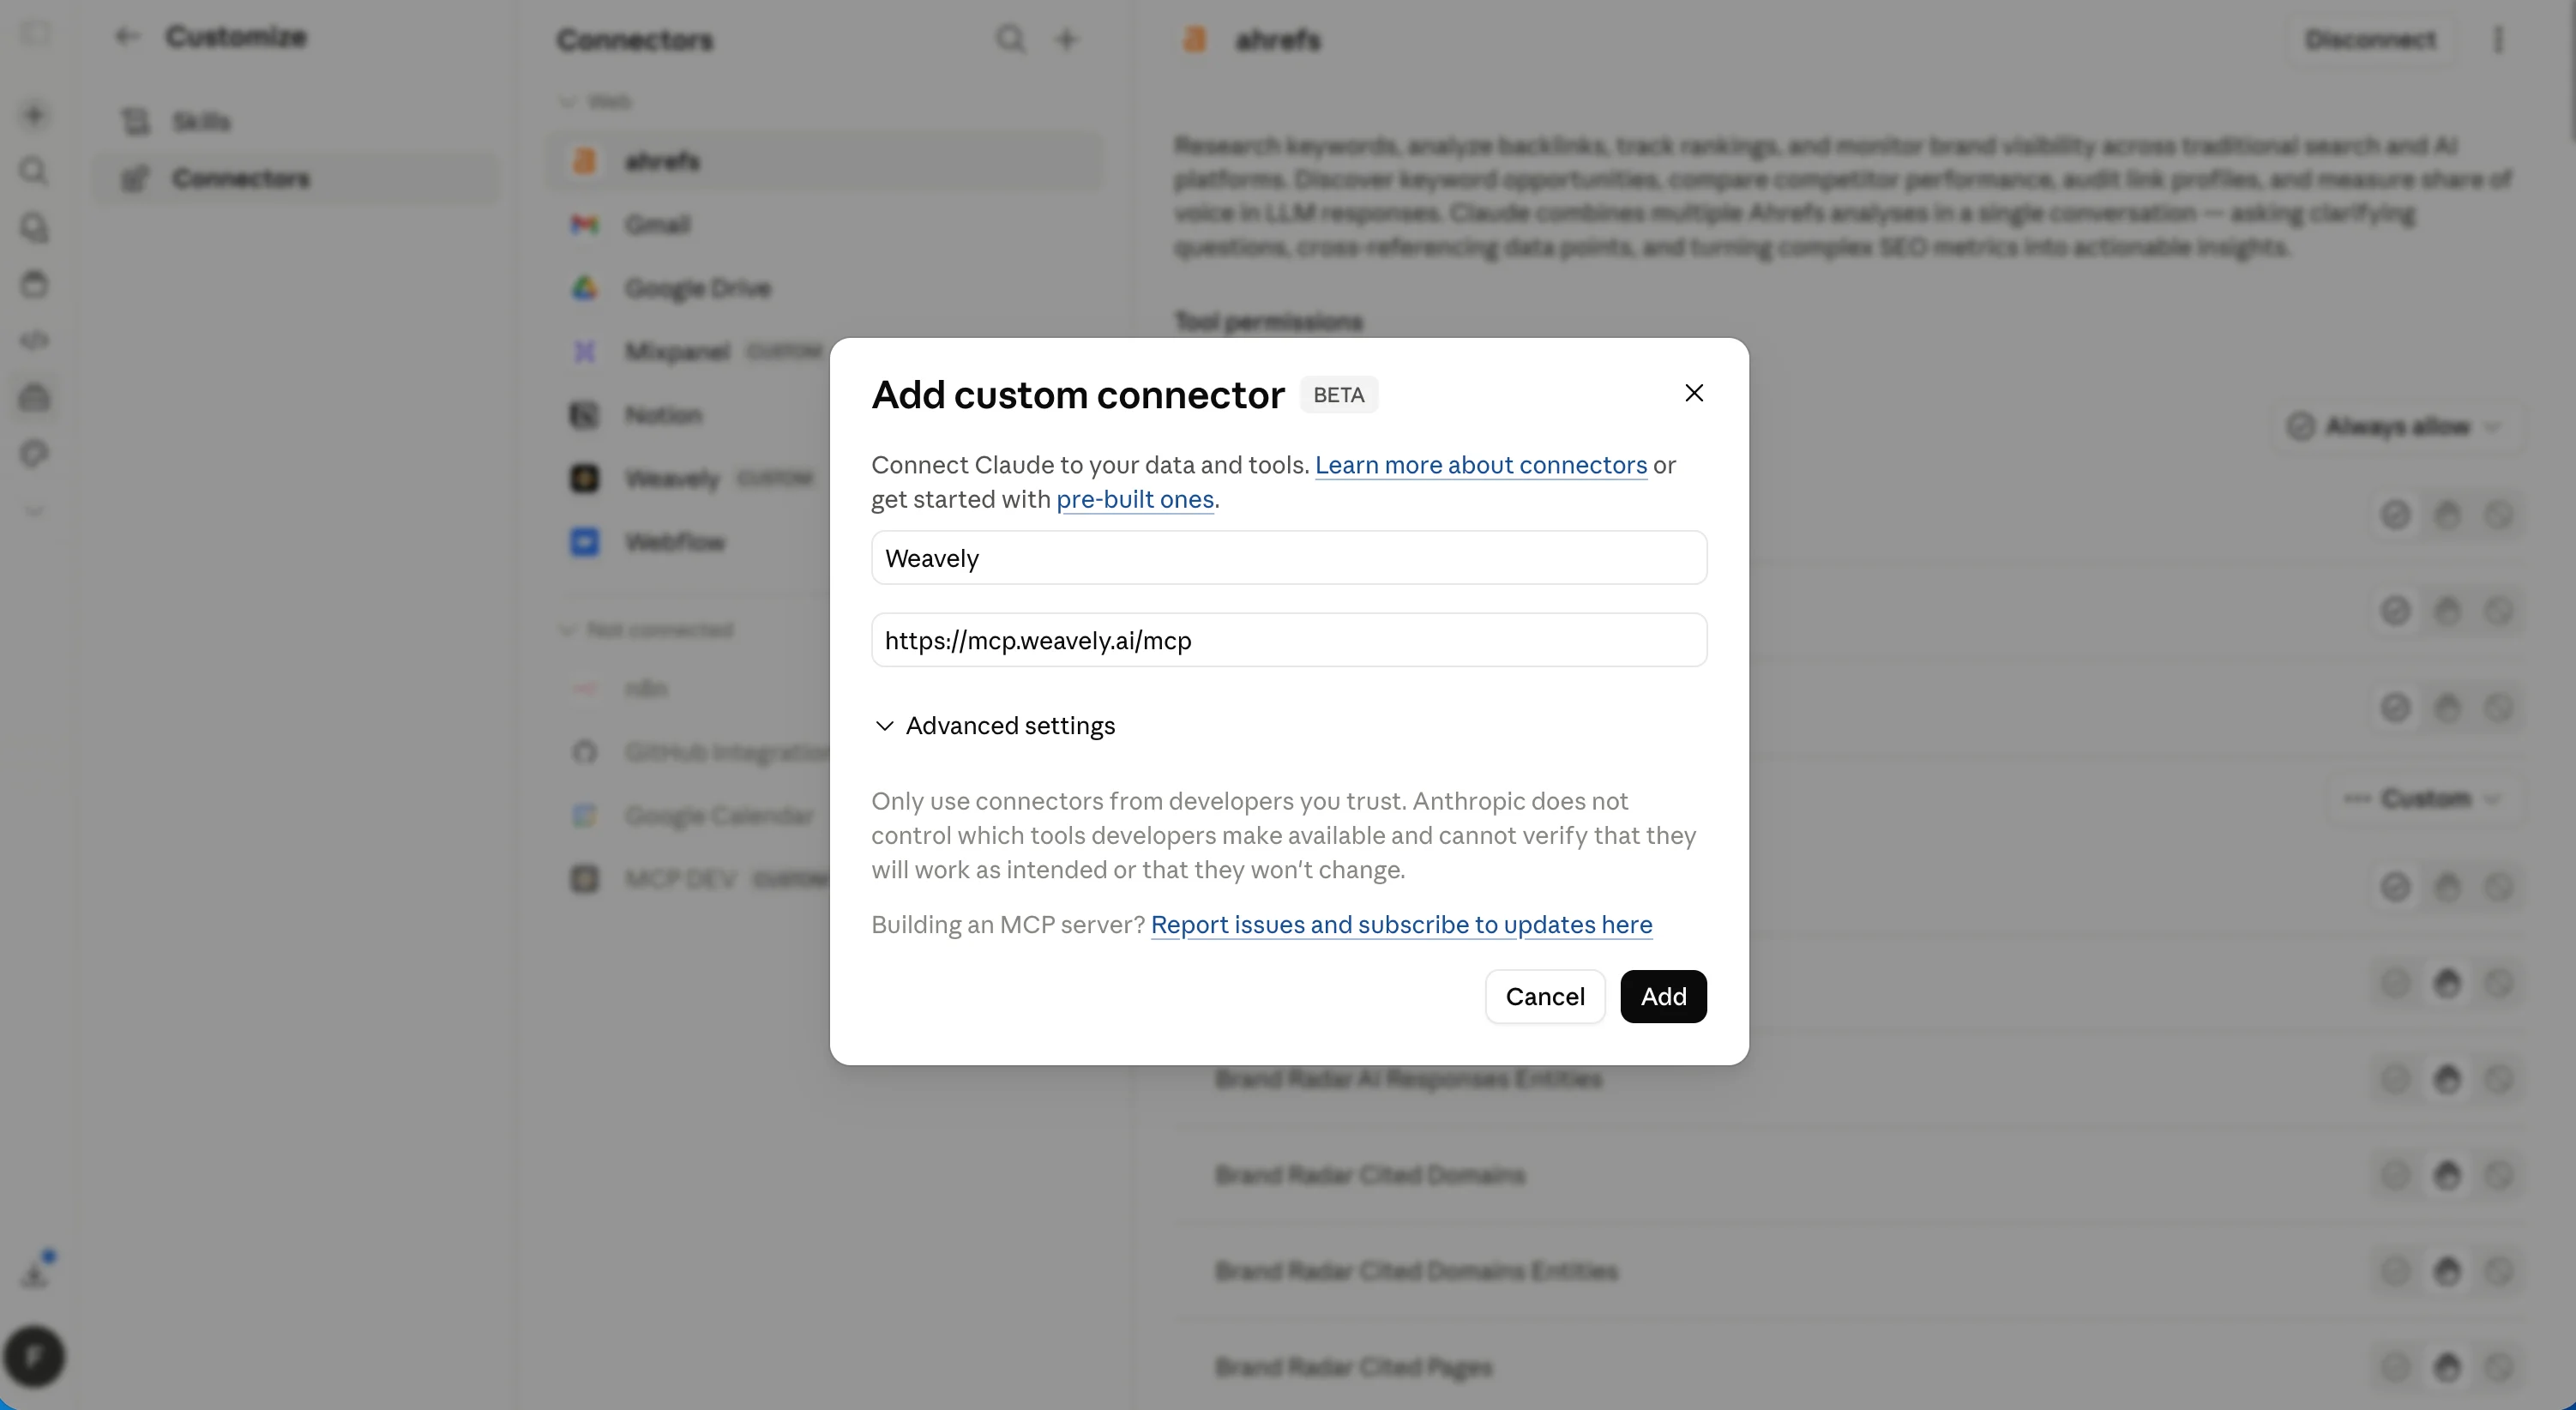
Free plans can add one custom connector, which is all you need here. Pro, Max, Team, and Enterprise plans can add more. (On Team and Enterprise, an admin may need to approve the connector first.)
To check it's working, start a new chat and ask Claude what tools it has access to. You should see Weavely's form-building tools listed.
Step 2: Build your first form
The fastest way to understand how any of this works is to build something. We'll start with a customer feedback survey, which is the most common form people build with this workflow.
Example 1: A customer feedback survey
In a new Claude conversation, paste this prompt:
Build a short customer feedback survey for my SaaS, [Your Product Name]. Keep it to 4 or 5 questions. Use Weavely.
A few things happen automatically. Claude reads the list of tools the Weavely connector exposes, decides which ones to call, and starts building the form. You'll see it tell you what it's adding, question by question. Within ten or fifteen seconds, you get a preview link.
Click the link. You'll see your form, fully rendered, ready to fill out. This is a real, working form. You can complete it, hit submit, and everything will look like it worked. The only thing it isn't doing yet is collecting your response anywhere. That comes in Step 5.
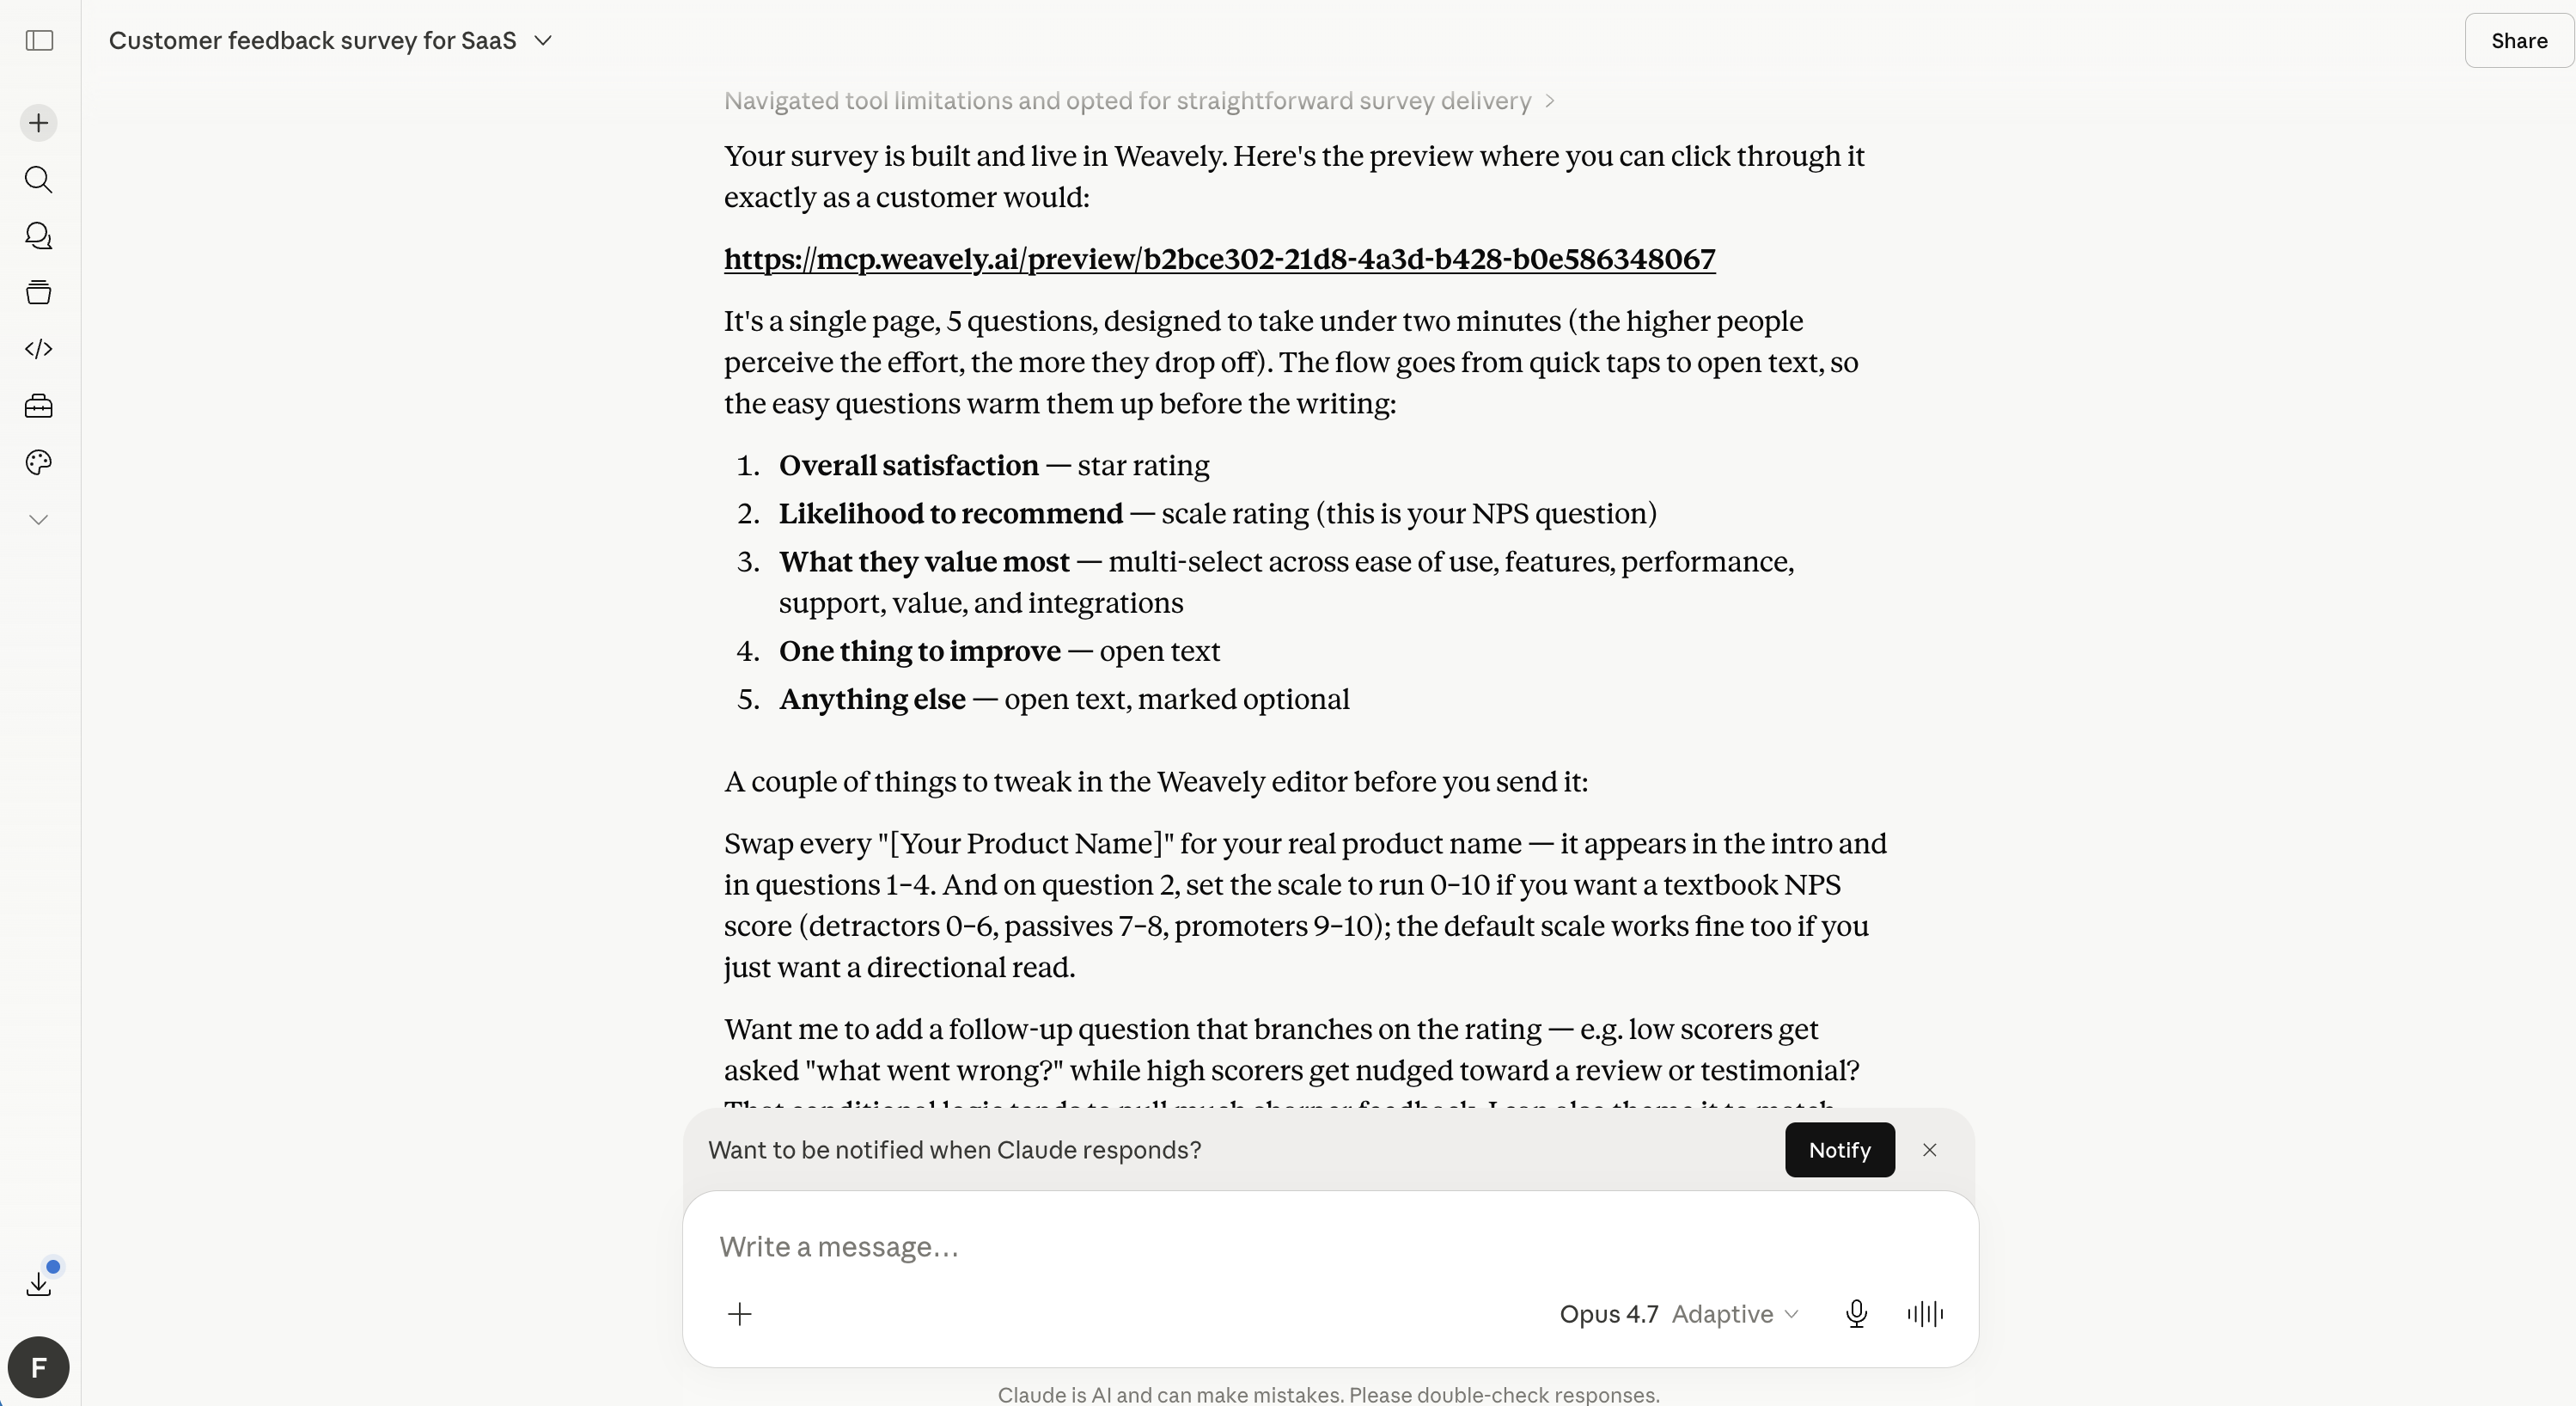
Take a minute to fill out the form yourself. Pay attention to what Claude chose: probably a star rating, an open comment field, maybe a question about how often you use the product. These choices come from Claude understanding what a customer feedback survey usually contains, combined with the field types Weavely supports.
If you don't like what it built, that's fine. You'll change it in the next step.
Prefer to start from something pre-built? Browse our customer feedback survey template and customize it in Claude the same way.
Step 3: Iterate on the form
This is where the workflow gets interesting. Every change you want to make is a sentence in plain English. Try these:
- "Add a question asking how they found us. Make it a dropdown with options like Google, Twitter, a friend, and other."
- "Move the comments box to the end of the form."
- "Change the star rating to a 1-to-10 scale."
- "Add an NPS question asking how likely they are to recommend us, from 0 to 10."
- "Make the email field required."
Each time you send a message, Claude calls a new tool, updates the form, and the preview link reflects the change. You don't need to click a new link. Just refresh the same tab. The whole thing takes seconds per edit.

A useful pattern: build the structure first, then style afterwards. If you try to design and write content in the same prompt, the results get muddled. Start with "add a question about X", "reorder these fields", "make this required". Once the form does what you want functionally, then ask Claude to apply a theme or change colors.
Step 4: Add conditional logic
Conditional logic is what takes a form from "a list of questions" to something that actually adapts to the person filling it out. Instead of showing every question to every respondent, you only show what's relevant given their previous answers.
This used to be a power-user feature buried under several menu clicks in traditional form builders. With Claude, you describe it in a sentence.
Example 2: An event registration form with conditional logic
Start a new conversation (or keep going in the same one) and try this:
Build an event registration form for a one-day workshop. Ask for full name, email, and which session they want to attend: morning, afternoon, or both. Add a question asking if they're staying for dinner. Only show meal preference options if they say yes to dinner. Use Weavely.
Claude builds the base form, then layers on the conditional rule. Open the preview link and try filling it out two different ways:
- Select "no" for staying for dinner. The meal preference field stays hidden.
- Select "yes". The meal options appear.
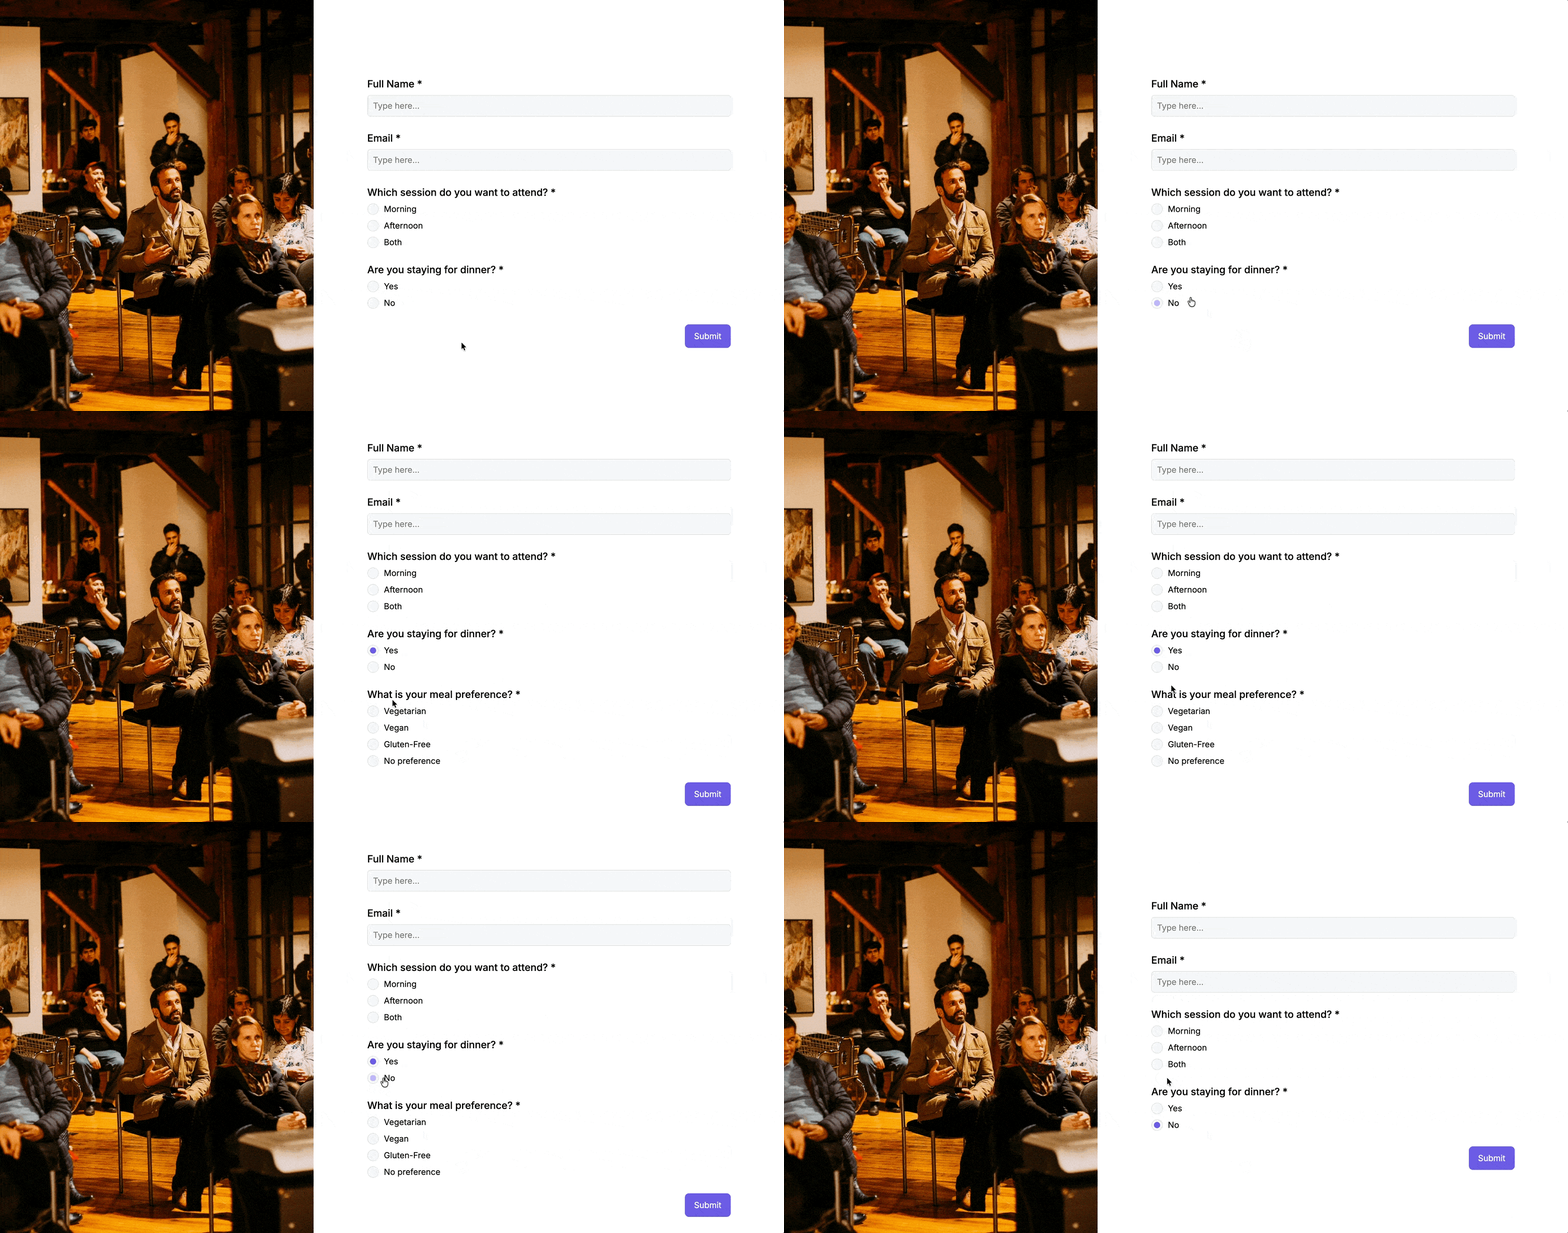
You can pile on more logic. Try:
- "Add a question about workshop track. If they pick the beginner track, skip the question about which advanced session they want."
- "Add a t-shirt size question that only appears if they're attending the full day."
Each rule layers on top of the last. The preview link stays the same throughout, so you can test as you go.
Want a head start? Open our event registration form template and adjust it conversationally.
Step 5: Publish and share
When the form does what you want, ask Claude to publish it:
Publish the form.
Claude returns a link that opens the Weavely editor. If you already have a Weavely account and you're signed in, the form is automatically linked to your account. If you don't, you'll be prompted to create one. It's free and takes about ten seconds. Either way, the form moves from "preview" to "live", and you get a shareable URL.
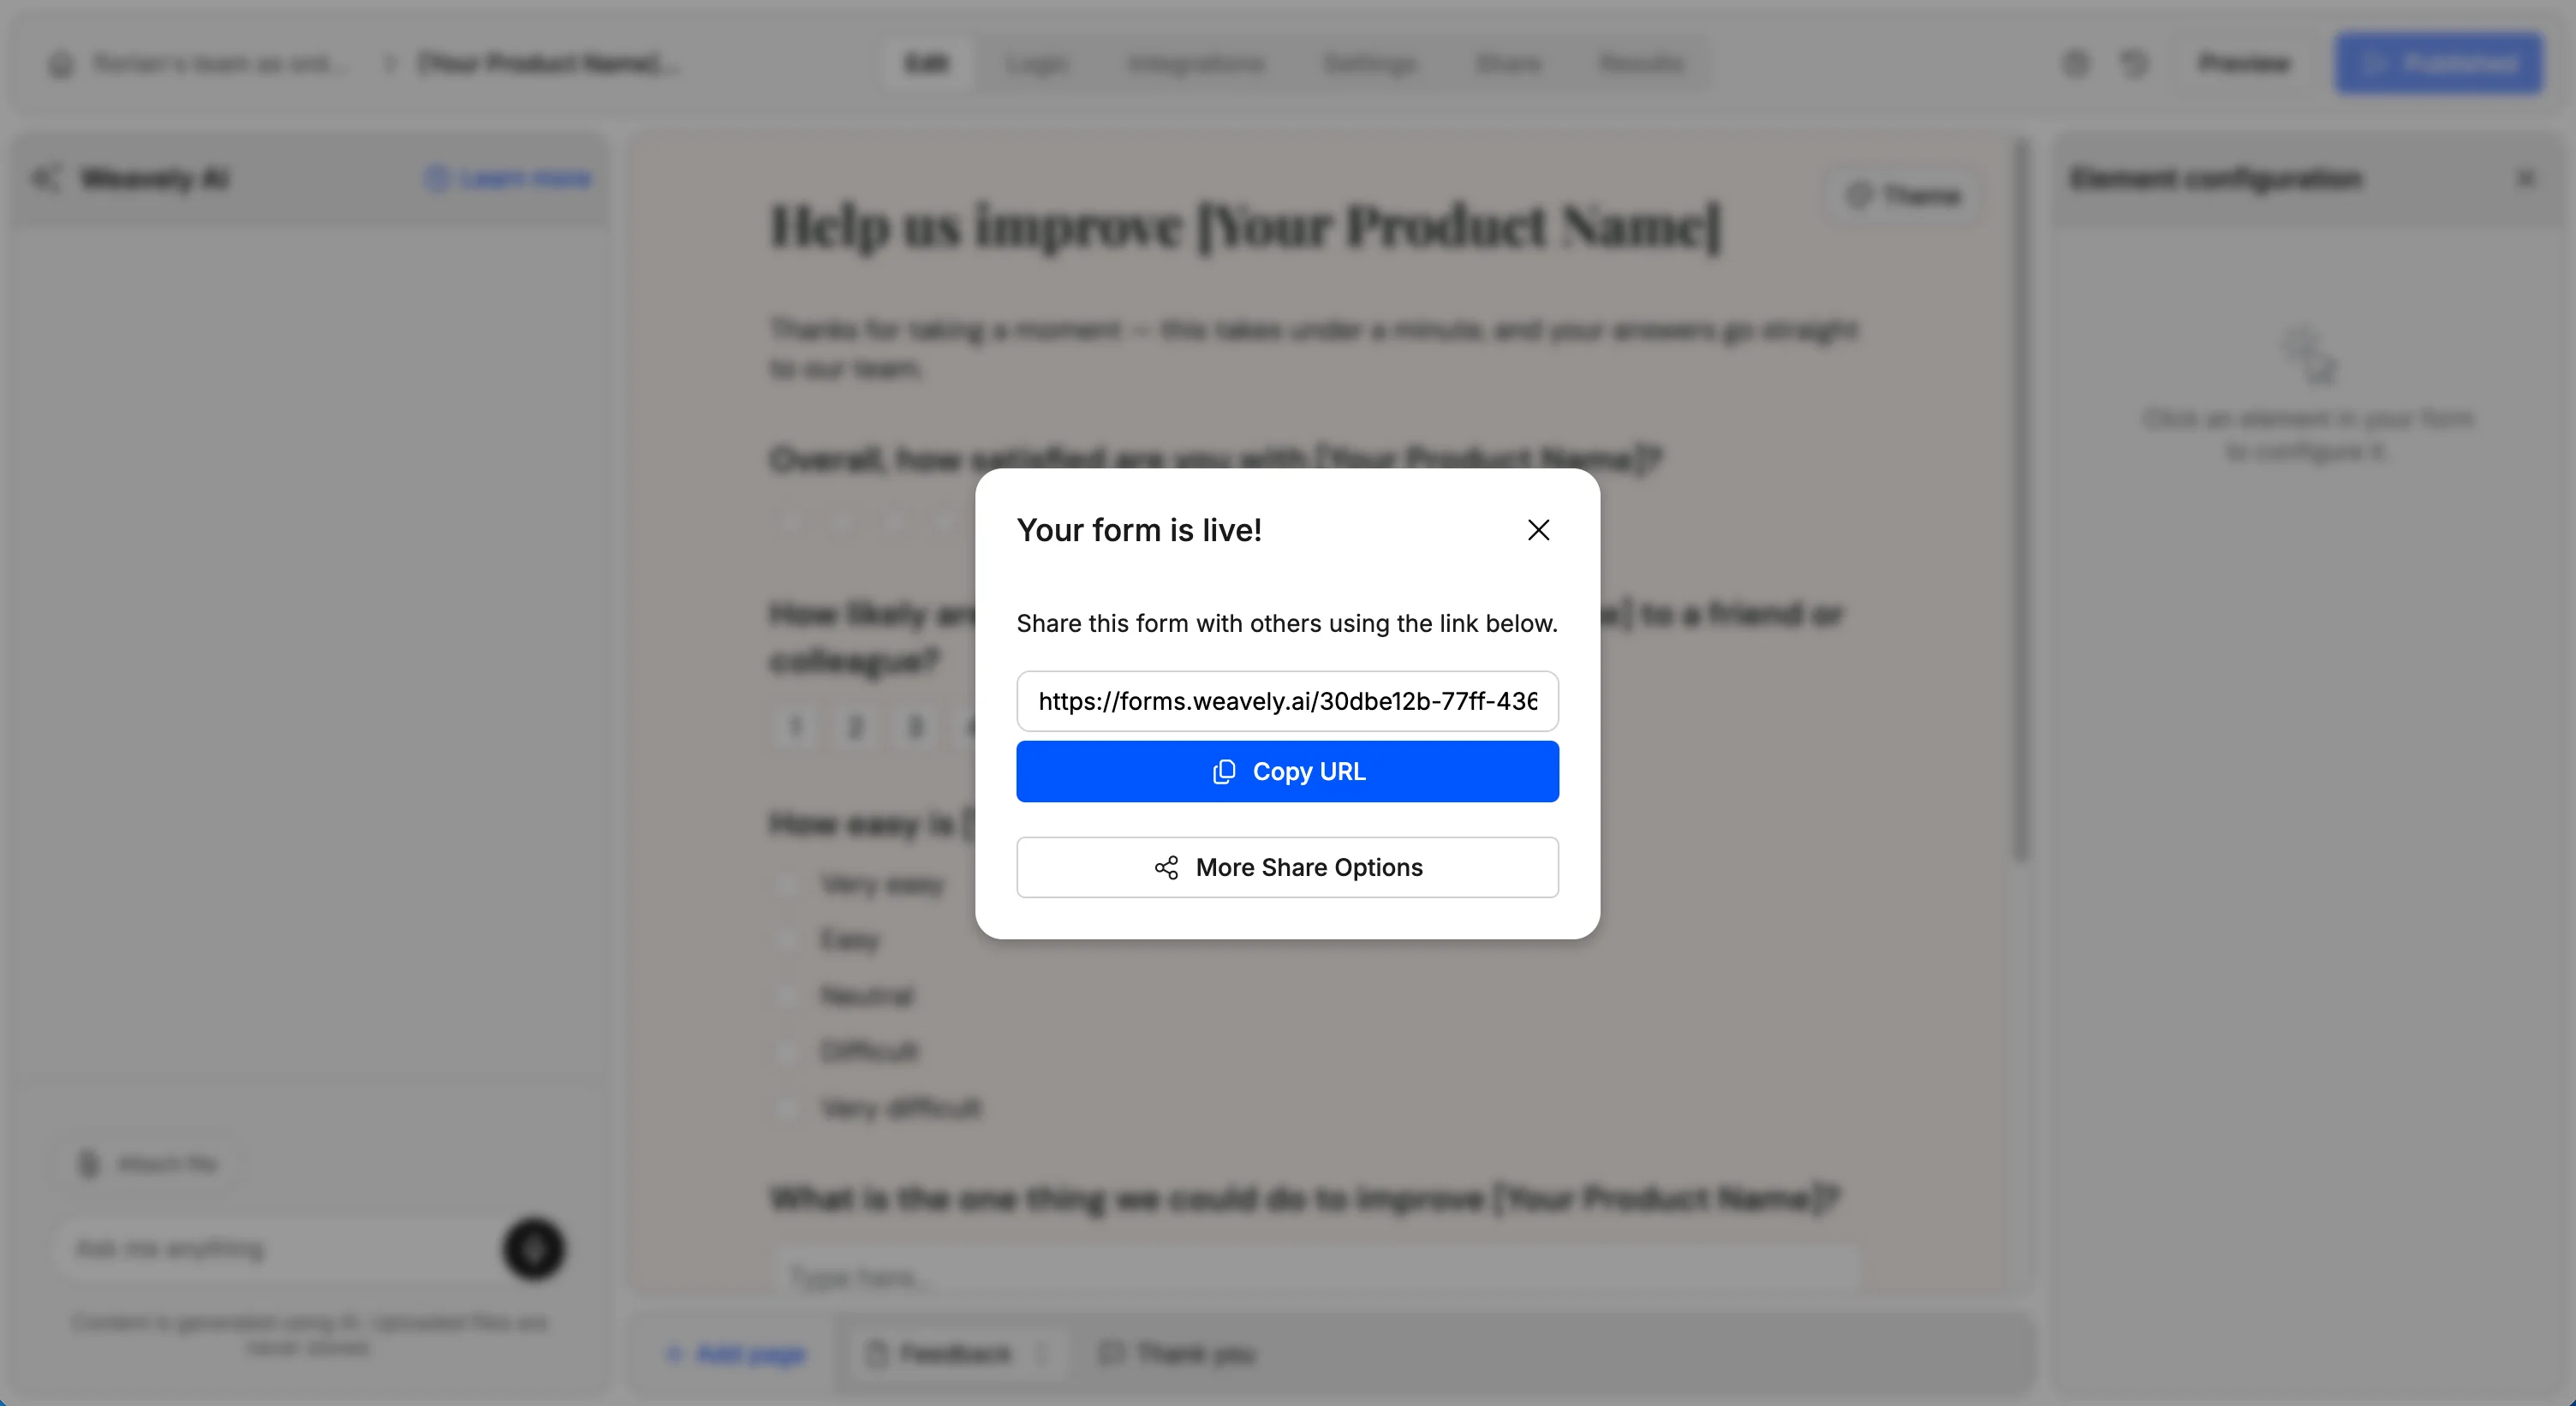
Inside the Weavely editor you can do a few things Claude can't do directly yet:
- Customize the design further. Colors, fonts, logos, page layout, background images.
- Set up integrations. Push responses to Google Sheets, Notion, HubSpot, Salesforce, Make, n8n, or Zapier. None of this happens by default, but each integration takes a few clicks.
- View responses. The Results tab shows everything as it comes in, with filters and basic analytics.
- Embed the form. Get an embed code to drop the form into a website or pop it up on a landing page.
You can always go back to Claude later and keep iterating. Any changes Claude makes flow through to the published form.
Two more forms you can build the same way
The workflow above isn't unique to feedback surveys. The same prompt, preview, iterate, publish loop works for almost any form you'd build in a traditional builder. Two more worth trying:
A client intake form
If you're a consultant, freelancer, agency, or anyone who takes on client work, you need an intake form. Here's a prompt that gets you most of the way there in one shot:
Build a client intake form for a freelance brand designer. Ask for the client's business name, what they do in one sentence, the type of project they need help with (logo, full brand identity, website design, or something else), their budget range as a dropdown, their target launch date, and a file upload field for inspiration or existing assets. Include a checkbox at the end so they can opt into a follow-up call. Use Weavely.
Claude will build it. Then iterate:
- Make the project type a multi-select instead of single-select.
- Add a question about how they heard about me.
Service businesses run on intake forms. Building one in three minutes instead of three hours is the kind of time saving that compounds across every new client.
You can also start from our client intake form template and tweak the fields to match your service.
A lead capture form
For marketing teams, a lead capture form lives on a landing page and qualifies prospects before they hit your sales team. Try:
Build a lead capture form for a B2B SaaS targeting marketing teams. Collect work email (required), company name, role, team size as a dropdown (1-5, 6-20, 21-100, 100+), and what they're hoping to accomplish in a short text field. If they pick team size 100+, also ask if they have an existing tool they're looking to replace. Use Weavely.
The form will route well-qualified leads down a slightly different path than self-serve prospects, all from one form. Same conditional logic pattern as the event registration example, applied to a different shape of question.
Or grab our lead capture form template as a starting point and refine it in Claude.
Tips for getting better results
A few things that help once you've built a handful of forms.
Be specific in the first prompt. "Build a survey" gets you a generic survey. "Build a 5-question post-event feedback survey for a 200-person tech conference, with a star rating, two multiple-choice questions, and one open text field" gets you something usable on the first try.
Iterate in small steps. One change per prompt is faster than five changes batched together. If you stack too many edits, you'll spend time figuring out what changed and what didn't.
Keep the preview link open in another tab. Refresh after each prompt. You'll catch issues faster than if you wait until the end.
Don't try to design in Claude. Claude can change themes and apply colors, but real visual polish belongs in the Weavely editor. Build the structure first, style afterwards.
Phrase conditional logic clearly. "Show this question only if they select X" or "Skip this question when Y is true" both work well. Vague phrasing like "make this conditional" gets vaguer results.
Save your prompts. If you build a form you like, save the prompt that built it. Next time you need a similar one, you can paste it back, tweak a few details, and skip the build-from-scratch step.
Frequently asked questions
Do I need a paid Claude plan to use the Weavely connector?
No. Custom connectors are available on every plan, including the free tier. Free users are limited to one custom connector, which is all you need for Weavely. The setup steps are the same on every plan.
Do I need a Weavely account before I start?
No. You can build and preview forms entirely without an account. You'll only need one when you ask Claude to publish, and at that point you'll be prompted to create one for free if you don't have one.
Can I edit the form after Claude builds it?
In two ways. You can keep editing it through Claude conversationally, and you can open it in the Weavely editor for anything Claude doesn't handle (deeper design customization, integrations, multi-page layout). Both work, and changes in one place show up in the other.
Where do the form responses go?
Into your Weavely account. From there you can view them in the Results tab or push them to Google Sheets, Notion, HubSpot, Salesforce, Make, n8n, or Zapier. Set up an integration once and it runs on every new submission.
Can Claude analyze the responses too?
Yes. Once responses are coming in, you can ask Claude to summarize them, identify patterns, or pull out specific quotes. Treat the response data the same way you'd treat any other data in a Claude conversation: paste it in or describe what you want, and Claude will work with it.
Does this work in Claude Code, or just claude.ai and Claude Desktop?
The Weavely connector works anywhere Claude supports MCP, including claude.ai, Claude Desktop, and Claude Code. In claude.ai and Claude Desktop you add it through the Connectors UI as described above. Claude Code configures MCP servers through its own settings or CLI instead, using the same server URL (https://mcp.weavely.ai/mcp).
What's the difference between a Claude connector and an MCP server?
Mostly terminology. "MCP" (Model Context Protocol) is the open standard Anthropic released for connecting AI models to external tools. "Connectors" is what Claude calls them in its consumer-facing UI. Same thing, different label.
What's next
The fastest way to make sense of all this is to try it. Connect Weavely, paste one of the prompts above, and see what comes back. Total time investment to your first working form is under five minutes.
If you want the connector URL one more time, it's https://mcp.weavely.ai/mcp. If you'd rather watch the workflow first, the video at the top of this post covers the same ground in four minutes.
Once you've built your first form, share it with someone and see what comes back. That's the part that turns a tutorial into a tool you actually use.

Florian is the co-founder and CEO of Weavely, where he does a bit of everything: from product and fundraising to making YouTube videos and writing for the blog. He holds a PhD in computer science and sits on the board of No Code Belgium, the country's no-code community, after more than seven years as a researcher and business developer at Vrije Universiteit Brussel. He writes the hands-on tutorials here, drawing on both an academic background and the day-to-day reality of building a form tool from the ground up. Based in Brussels.